
CtrlPortals - Enhancing the M-Files Sample Vault#
In this tutorial, we will walk through how we can modify the M-Files Sample Vault using CtrlPortals.
The goal of this tutorial is that you should become comfortable with configuring CtrlPortals from scratch and you should become familiar with the basic concepts in portals.
I’m assuming that you are at least familiar with the M-Files Vault administration tools to some degree. If that is not the case, please take a look at M-Files’ documentation. It’s not required that you know the whole thing, but you should at least be familiar with how you can open the administration application on your M-Files server (or on your local computer).
The Sample Vault#
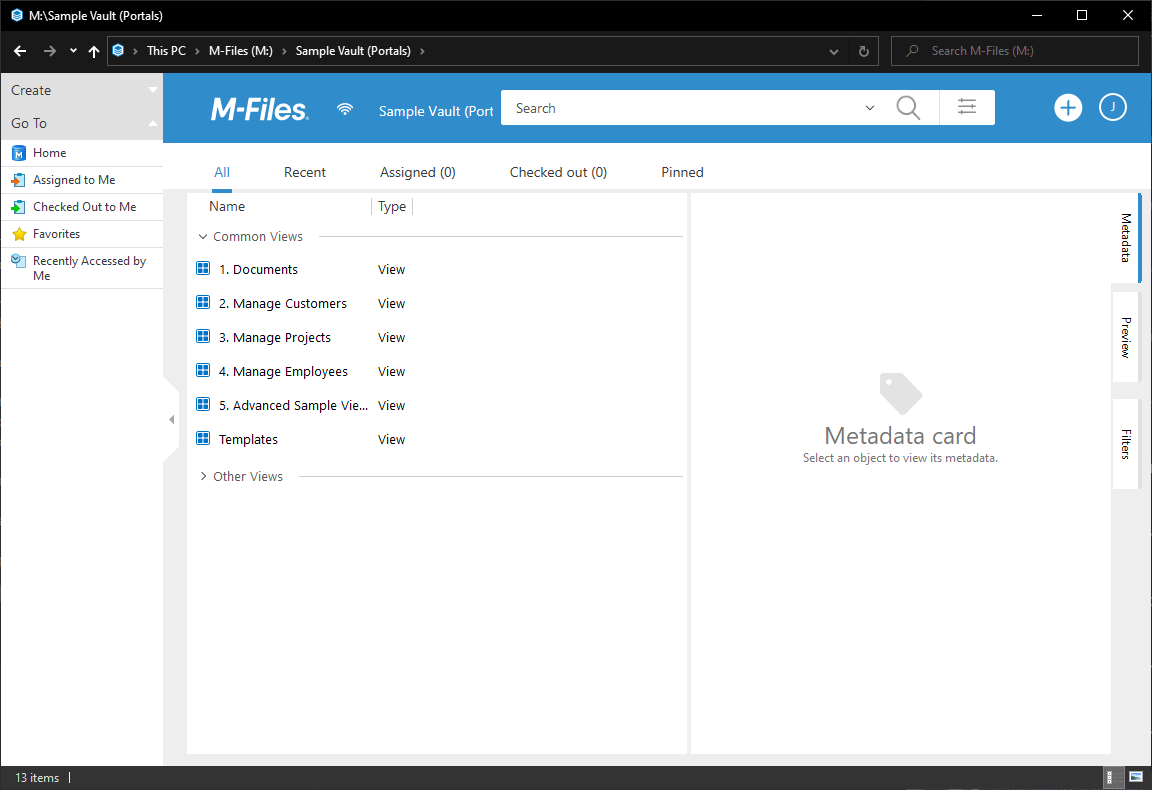
The layout of the sample vault#
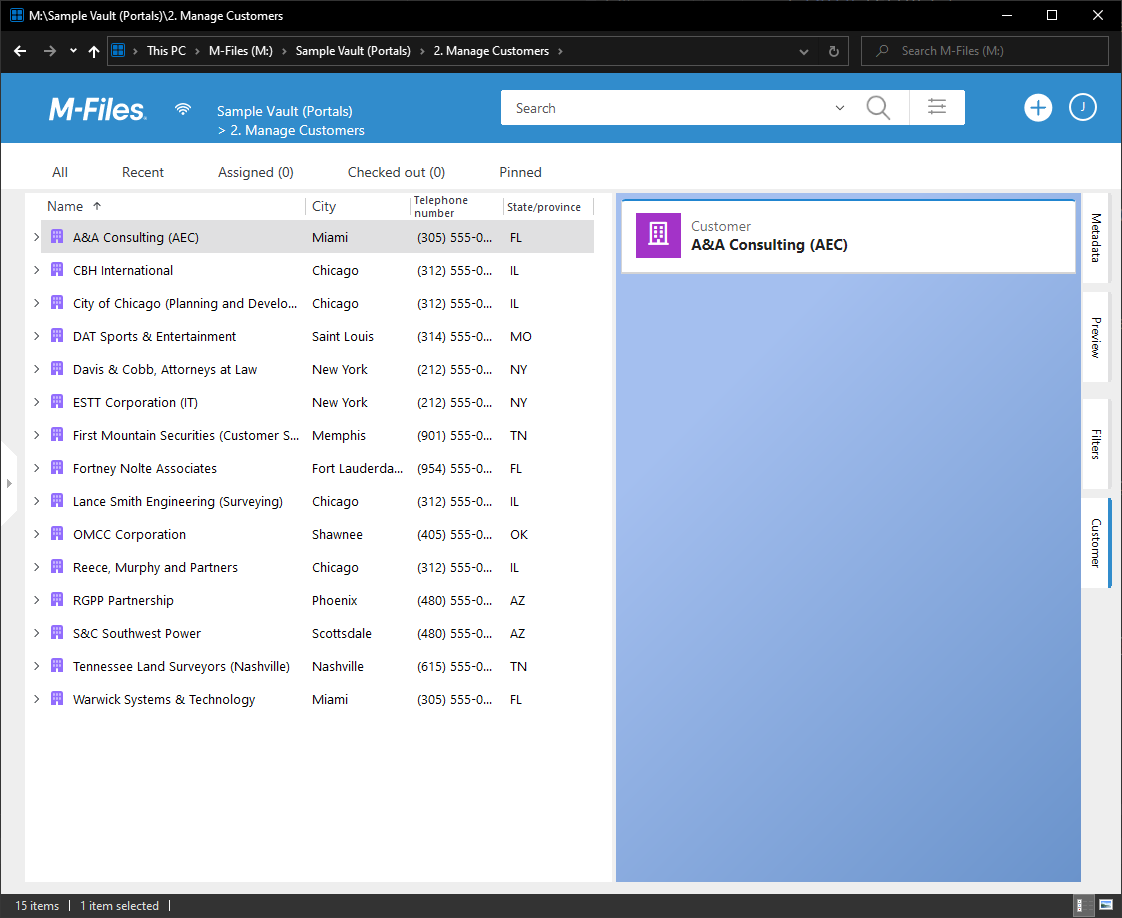
The M-Files Sample Vault might be familiar to you already. It is a very basic example of a CRM system, used to manage customers, projects, employees and invoicing, all of this is available through the different views baked into the vault.
We want to expand upon this example, first, we’ll focus on the customer documents.
Before we get too far, however, we need to set up our installation of portals.
Installation and Configuration#
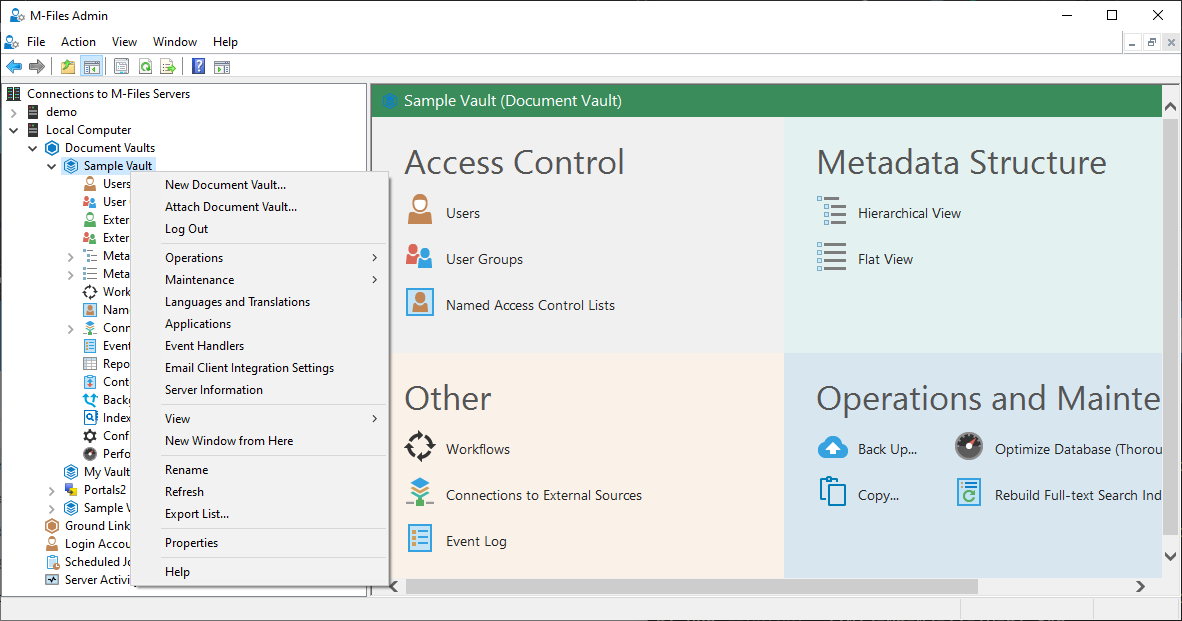
The admin application, the context menu for sample vault.#
Assuming that you already have a copy of the CtrlPortals .mfappx file, open the M-Files administration application and locate the sample vault. Open the context menu and select ‘Applications’.
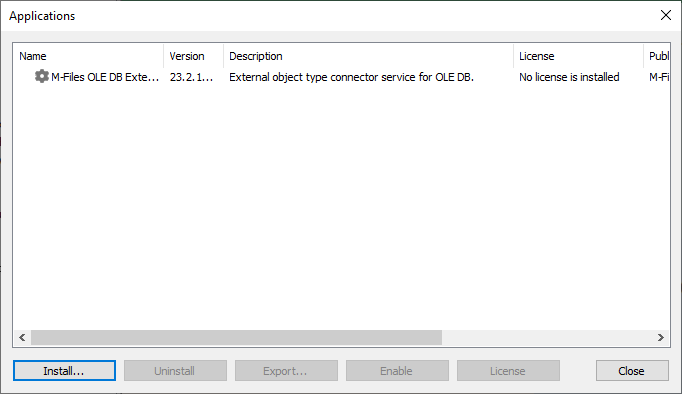
The ‘Applications’ window#
Press install and select the CtrlPortals .mfappx file. Select the license and add that to the Portals Application as well.

The installed, licensed CtrlPortals application#
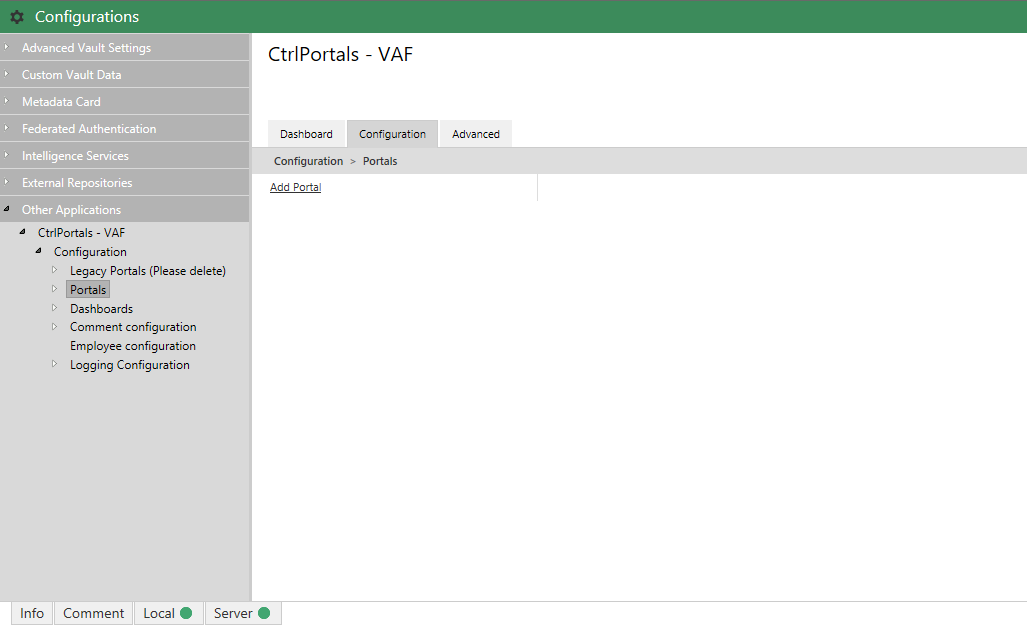
Now we move on to the configuration. Select the configuration menu and go to ‘Other Applications’. Here, select the ‘CtrlPortals - VAF’ application.
You should be met with a small dashboard listing information about the application.
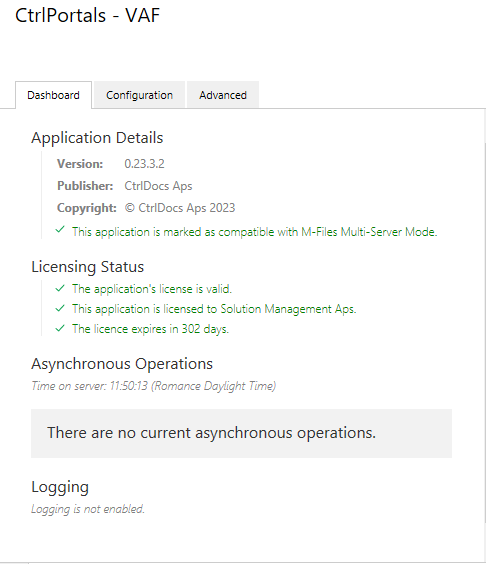
Application dashboard#
Now we will enable some optional features.
CtrlPortals provides a comment-feed feature that can be used to track not only version-comments for M-Files objects but also a custom comment object type, allowing for structured comments with replies, mentions and editing features. This is not necessary for our portals installation, but it is quite handy for a CRM system to have, therefore, we will add this feature to our sample vault.
Go to the configuration tab and expand the ‘Employee configuration’ menu.
First, fill out the ObjType, which is simply the existing Employee object.
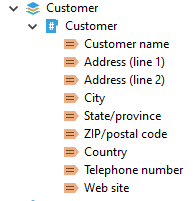
Then we need to set the UserProperty field. If we take a look at the Metadata structure for the sample vault, we can see that the User property already exists as the ‘M-Files User’ property.
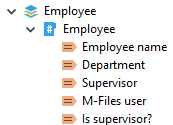
The user property in the hierarchy called ‘M-Files User’#
So, we pick this property for our UserProperty entry in the configuration.
Then, there’s the ImageProperty field. This is not necessary for our tutorial, but if we were to add it, it should be a text property that should contain an image representing our user, encoded in base64. We’re going to gloss over this for now.
The editor might complain that the ImageProperty field is required, but we will ignore that.
The next step is to set up the comment configuration.
First, we need to create a new comment object and comment class, do this by right-clicking the ‘Metadata Structure (Hierarchical View)’ item from the menu on the left and selecting the ‘New Object Type…’ option.
Fill out the form to create the new Object. I like to call this object ‘Comment/Comments’. If you feel like it, you can give it a speech-bubble icon or something similar.
Now, fill in the configuration entries for the Comment configuration, specifically the ObjType and CommentClass entries.
Now we need to add a bunch of properties:
The Author property, this should be a lookup (Choose from list) property that selects from the Employee list.
The Content property, this should be a multiline text property.
The Guid property, this should be a text property.
The ParentGuid property, another text property.
The ParentObject property, this should be a lookup property that selects from the Comments list (the Comment objects).
The Mentions property, this should be a multi-select lookup property that selects from the Employees list (the Employee objects).
If you haven’t created a property before, the procedure is to go to your Comment class in the Hierarchical View, right-click and select the ‘add property’ option from the context menu.
Once you’ve added all the properties, go back to the configuration and fill in the blanks.
Configuring your first Portal#
Now that we have configured our Portals installation (ensure that traffic-light tabs at the bottom are not red, preferably green), we can set up our first Portal.
I want to create a simple Portal that displays information about our customers whenever we select a Customer object in M-Files, instead of just displaying the Metadata card. I want to make it easy to see the status of our projects and how many invoices have been sent and paid to the customer.
Again, this is done from the M-Files administration application (M-Files Admin) and the configuration menu for ‘CtrlPortals - VAF’. This time, expand the Portals item in the Configuration menu.
We are now met with the option ‘Add Portal’.
The configuration menu, with the option of adding a Portal.#
Click ‘Add Portal’ and expand the Portal item.
Here we define the behaviour of the portal, let’s start by naming it by filling in the Title field.
Set the title to ‘Customer’.
Then, open the classes list and add a ClassMapping entry. This is used to determine when the portal should be opened. In our case, we want to add the Customer class.
Now, for the UI part.
UI#
Before we get too far, please note that you can update the Portal configuration by pressing the CtrlPortals>Refresh Configuration button in the left pane.
The UI of a portal is defined by nesting a structure of UI components. We start by expanding the components list.
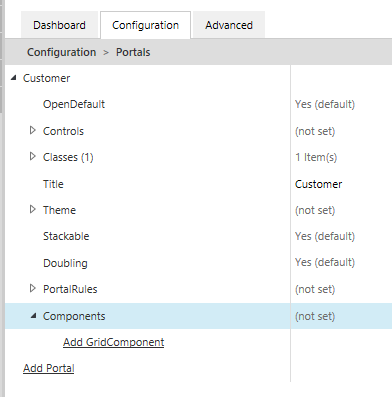
The components list#
Then we add a new GridComponent.
A GridComponent is the outermost type of UI component. It is used to contain the contents of our UI in a grid of rows and columns. By default, there can be an infinite amount of rows, but only sixteen columns in our GridComponent.
We can also have multiple GridComponents if we e.g. want to have different widths in the same Portal.
Let’s structure our Portal so that the basic customer information is easily visible and editable at the top of the Portal, and then we can add some illustrations and lists for our projects and invoicing.
Our top GridComponent should be of the type HeaderSegment. This is what we would expect to exist at the top of a Portal.
The header property should be the name of our customer, so select ‘Name or Title’ from the dropdown list for the HeaderProperty field. Then, for the Subheader Property, let’s select the Class property.
We can also set an Icon to display next to our header. Under the hood, CtrlPortals uses something called ‘Fomantic-UI’, which provides a list of icons. I’d like to reflect the M-Files icon for customers (a purple building), so I’m going to select building outline and additionally, add bordered inverted purple to make the building purple like in M-Files. Finally, I put in icon to specify that we’re using a Fomantic-UI icon.
So, in my case, the whole text put in the Icon field is bordered inverted purple building outline icon.
Now, the Portal for Customers should look like this:
The first iteration of the Customer Portal#
You can also play around with the colours a little. The colours for the icon match the colours found in the Portal/Theme/Accent configuration. Try changing the colour of the icon and the accent to violet and see what the result is like.
List View#
If you recall, we wanted to get an overview of the projects relevant to this customer, so let’s start by adding a list.
First, we need to add another GridComponent, this time, let’s add a regular Segment.
Inside the segment, we want to add a List View that shows us the projects relevant to this customer. This implies the existence of a regular View in M-Files that shows us all projects grouped by customers (such that we can look up the relevant customer in that view).
So, first, we create a new View of all projects and make sure that it is grouped by Customer.
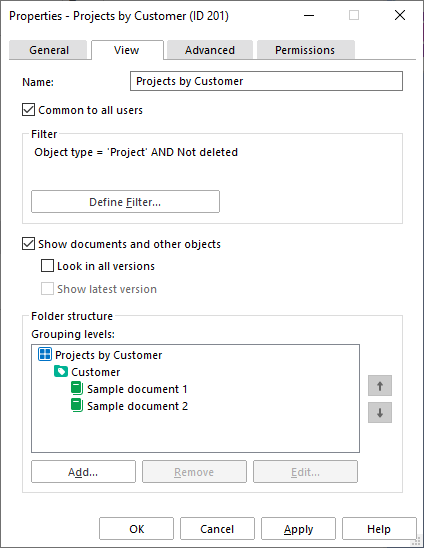
The new View#
As we can see in the title bar of the View, the ID of this view is 201.
Now, we add a new List View to our Segment component and select our view name from the list.
This changes our view once again.
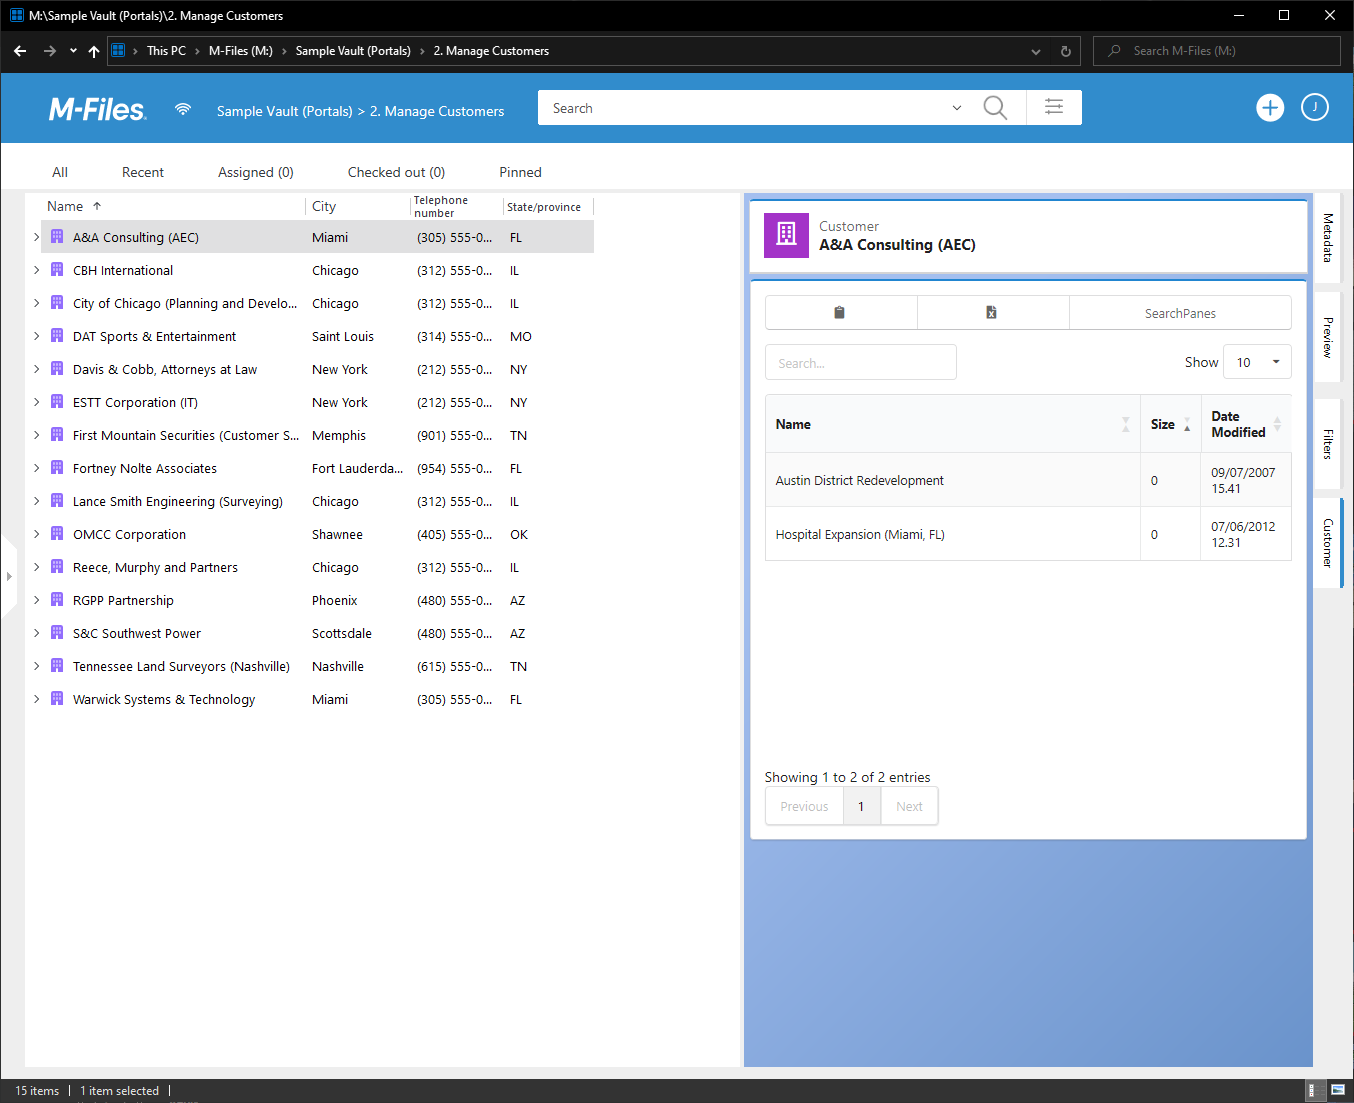
The ListView is added.#
Note that our projects are shown with a ‘size’ column. This is because we haven’t selected the columns for our view yet!
Go to the view and select one of the customers. You should now see a list of projects. Right-click the header and select the columns you would like to see.
For our customer, we want an overview of each project. We would like to see the customer’s contact person, the project manager for the customer and whether the project is in progress or not, so we select the corresponding columns. When we’re done, right-click anywhere in the view and select ‘Save as common display settings’. If the option is not present, make sure that your user has the ‘manage common views’ right or simply full control of the vault.
Now the list view should be updated as well:
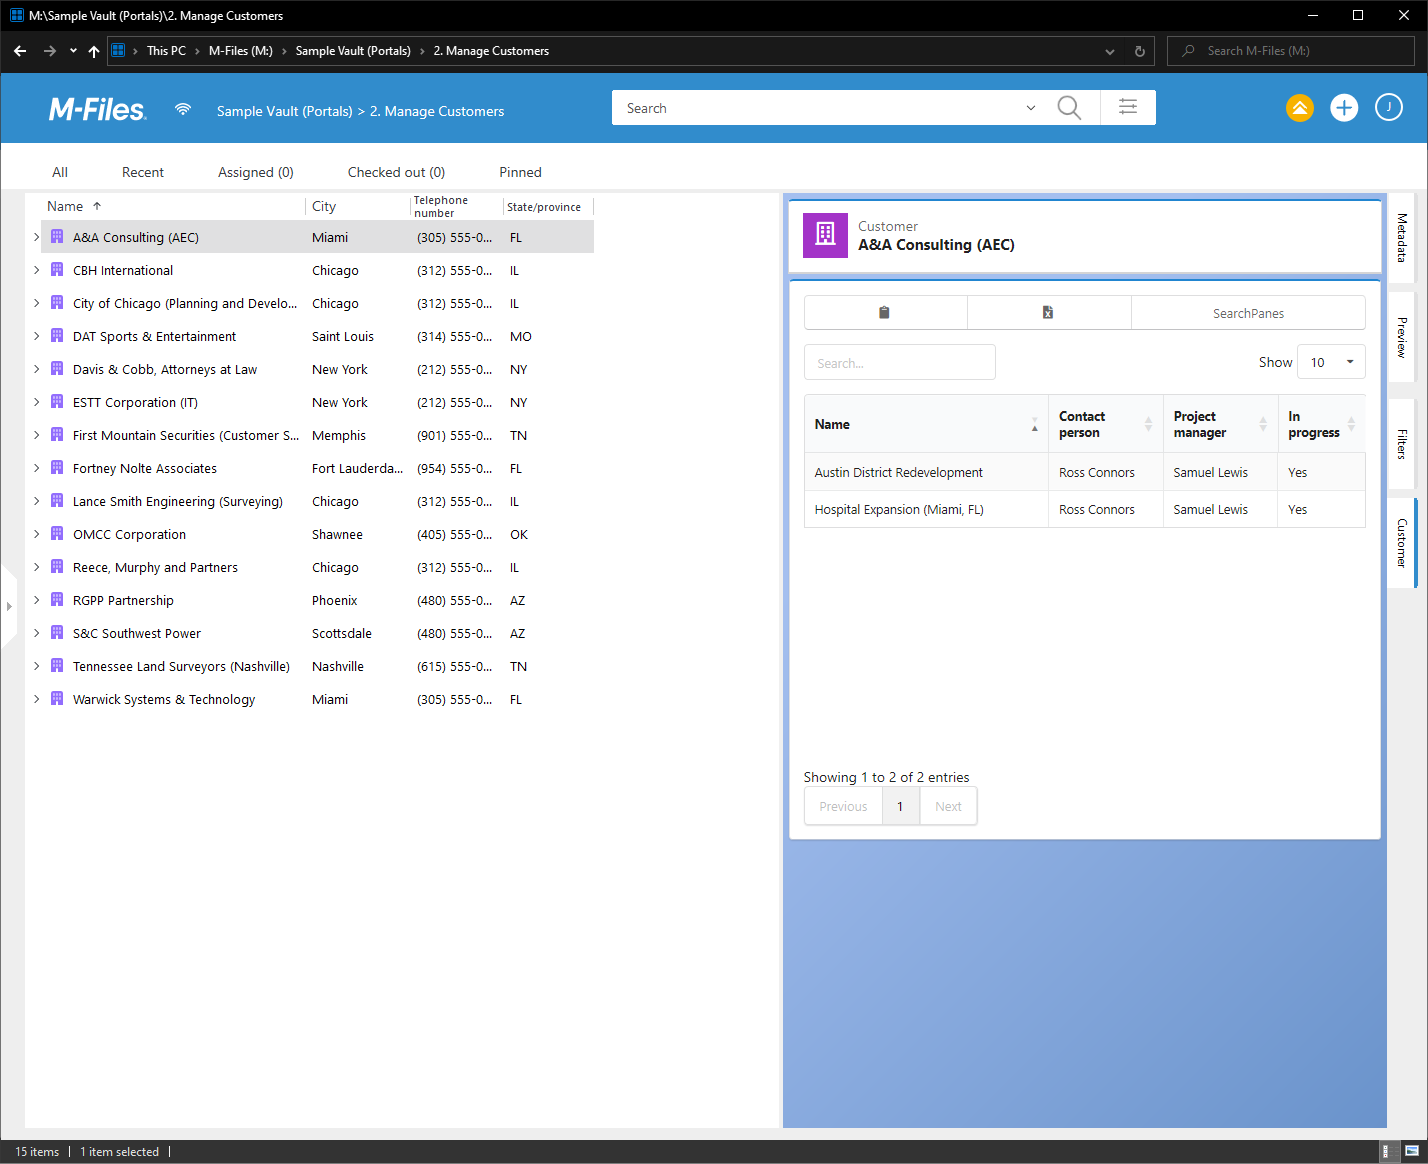
The list view with our new columns.#
Editable Forms#
Now we have a fine overview of the projects associated with our customer, but this is not much better than a regular view. Let’s make the customer editable so that we don’t need to open the metadata card to edit the customer data.
Go back to the Admin application and add another GridComponent between our two existing components. Once again, select Segment Component for the type. Within the Segment Component, add a Form component. Form components are used to change data associated with M-Files objects. However, we need to add fields for each property we want to be able to edit.
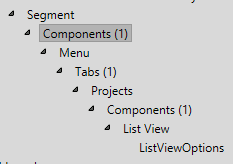
The properties of the Customer object#
So, within our form component, let’s add fields for editing every single property. Note that you can arrange fields within field accordions, columns and rows, so that multiple fields can be displayed side by side or can be expanded or closed. I have cheated a bit and have prepared a structure for this.
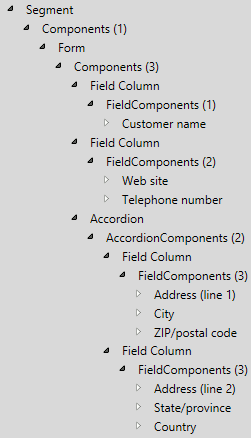
The structure of my Customer portal#
The resulting portal#
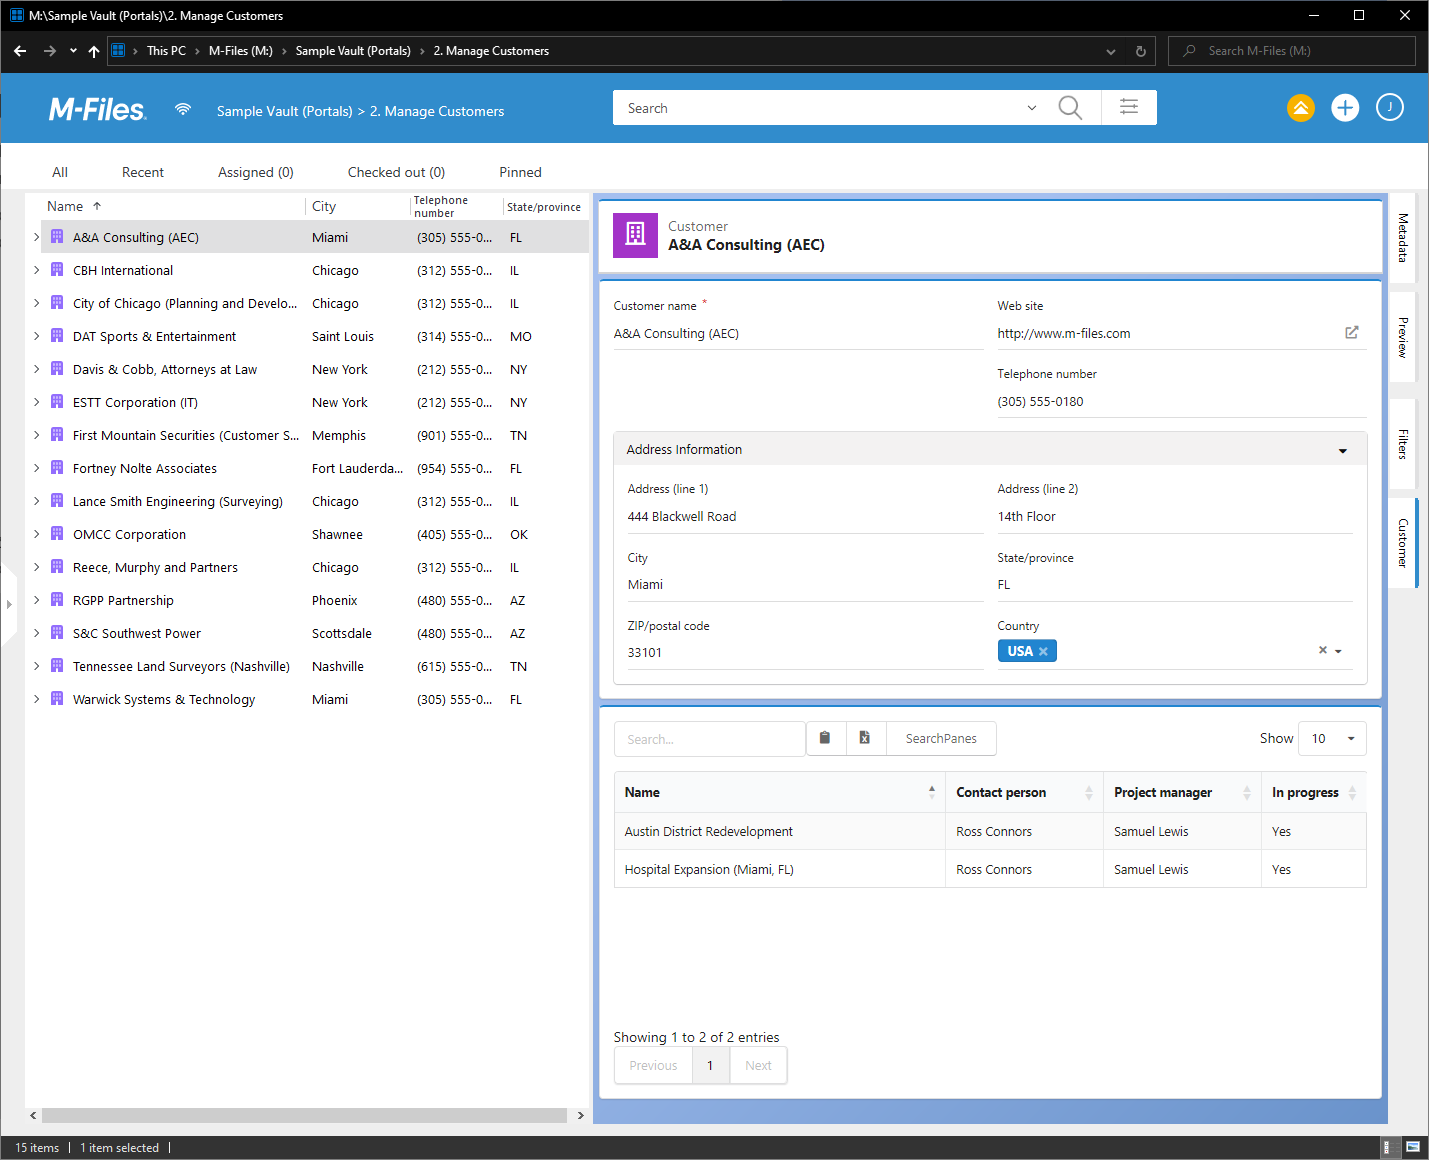
Now that we’ve added a lot of fields, we would like to make those editable in the way that M-Files usually do, with the check-in/out mechanics. To do this, we need to go to the root of our Customer Portal and open the ‘Controls’ option. This option needs to be enabled.
The Portal with the ‘Controls’ option enabled#
Once enabled, you should be able to see the workflow controls as well as a button labelled ‘Edit’ in the lower right corner. If you press that button or double-click any of the fields, you will be able to edit the data directly in the Portal.
Note that I adjusted the List View ‘ScrollY’ option to 150 pixels, to keep everything visible in the screenshot.
Menus & Plot Views#
Now we have a pretty good portal for editing and viewing our customer, but we still need to add some information about the invoicing related to that Customer. We could use another list view, but I would like to provide an easy overview of how good our customer has been over the years. So, I would like a graph showing the total amount invoiced to that customer every year.
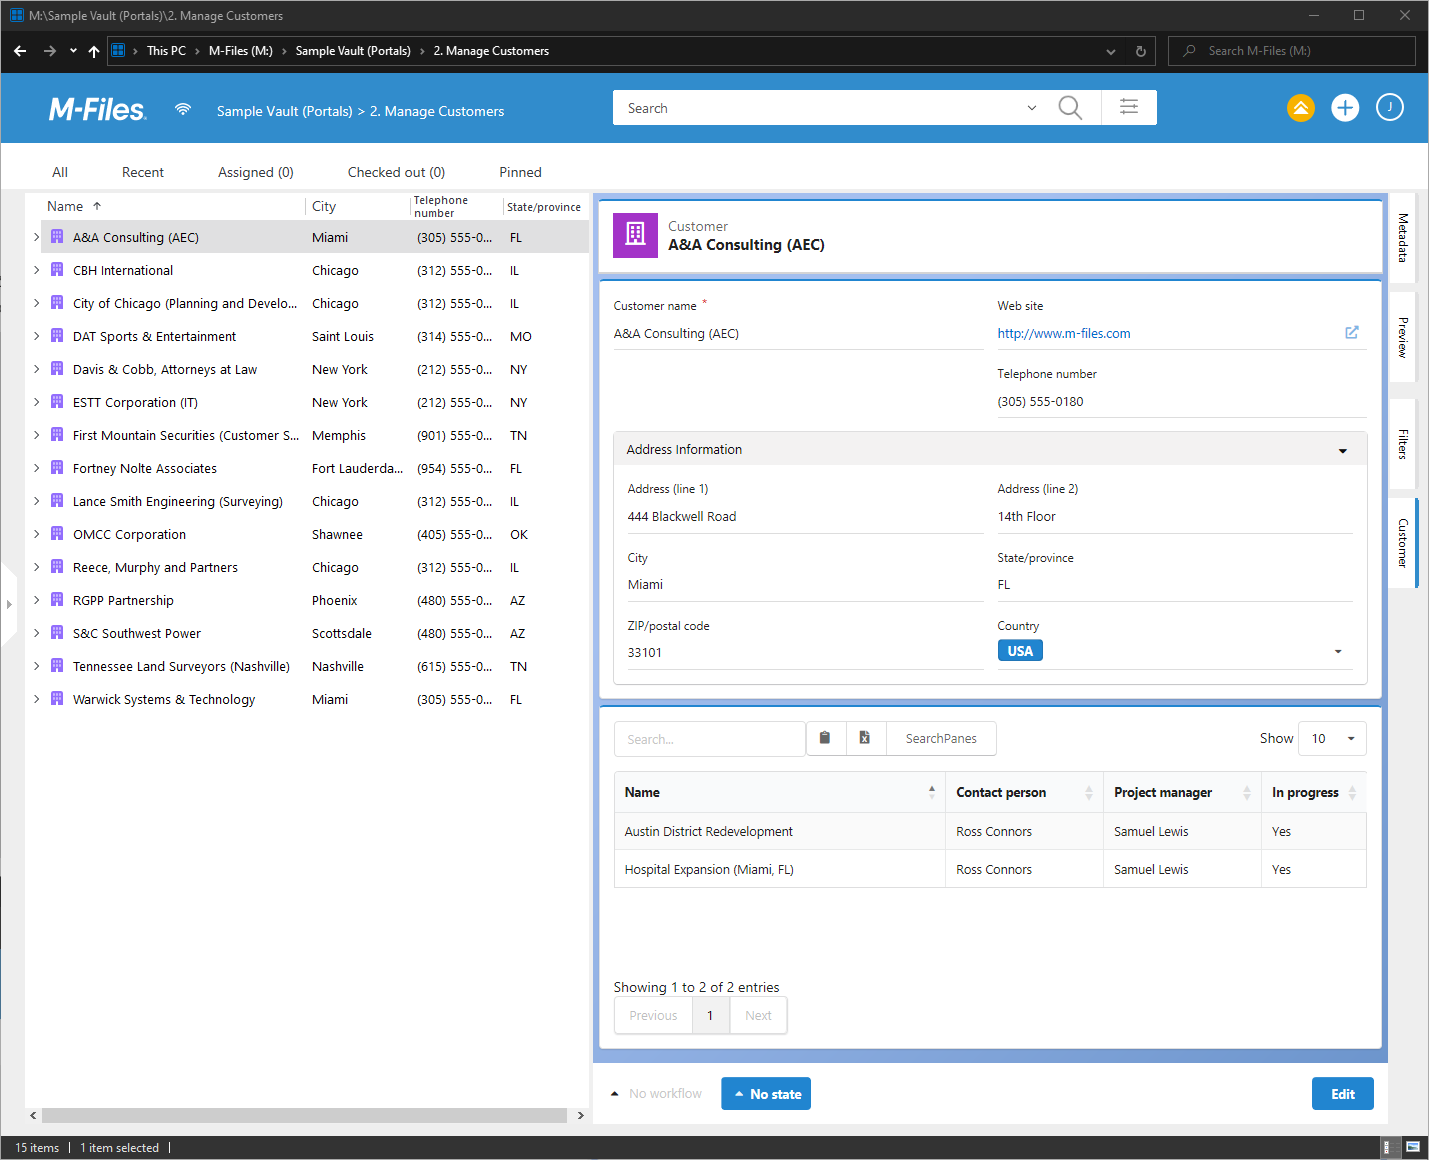
For this, we need to use our Plot View component. To make things easy to fit on one page, I’m going to put our existing List View into a Menu component, specifically into a separate MenuTab (so that we can switch between our projects and invoicing data).
So, we add a Menu component to the Segment component containing our list view. Then, we add a new MenuTab and name it ‘Projects’ and move the list view component inside.
The structure of the last segment component after putting the List View into a Menu#
Then, we add another MenuTab called ‘Invoicing’.
Inside that MenuTab, we add a ‘PlotView’. Now, Plot Views are probably the most complicated components, but when used correctly, they can be used as a proper BI tool. For this tutorial, we’re going to do a rather simple plot for each of the customers.
First, we insert a new Plot View and name it by setting the Title to ‘Invoices’. Then, we set the height of the plot to 300 (pixels).
That was the easy part.
Now, expand the QueryConfiguration configuration option; this is the part that determines how data is queried from the M-Files vault. The Query consists of a set of Series. Think of these like series in Microsoft Excel. The first step is to fill out the name of the series and the objects we are looking for. For this plot, we only need to get the invoice objects, so we set the name to ‘Invoices’, the object type to Document and the document class to ‘Sales Invoice’. We only want invoices relating to our current customer, so we need to set the relation. There are two kinds of relations:
Direct relation: A property on our Customer object points to the objects that we are searching for.
Indirect relation: A property on the Invoice objects that we are looking for points to the Customer object.
We set the Indirect relation to ‘Customer’ as this is a field that exists on our invoice document objects.
Then, we need to select some properties from our invoices. In this case, I want to select the invoice date, so we go to SelectedPropertyValues and add the ‘Document date’ property and set the column name to be ‘date’.
Unfortunately, the Sample Vault’s invoices do not contain any properties determining how much money each invoice is worth, so we will instead simply count the number of invoices in total. To do this, we need to select the Aggregation ‘Count’. Aggregations only work when we’ve grouped on one of the selected properties, so we put ‘date’ in the GroupColumns option.
Then, to group by date, we set the RoundDateTimeColumns to ‘date’ as well, and pick ‘date’ for the RoundDateTimeUnit option. Then, since we are grouping by ‘date’, we need a different property to count. This could be any property that is always available on our invoices. In this case, I will use the property ‘Name or Title’ and name it ‘count’.
It is a good idea to imagine that we are constructing a table of values.
So, now we have two selected columns, date and count, and we want to group the data by date (on the column date), counting all other columns, so our table should look something like this (with placeholder values):
date |
count |
|---|---|
2019 |
65 |
2020 |
30 |
2021 |
92 |
2022 |
40 |
2023 |
32 |
… |
… |
So, the only missing step is to set the LabelColumn, which determines which of our two will be used for the label-axis (x-axis) in our graph and the ValueColumn, which determines which of our columns will be used for the value-axis (y-axis). These should be ‘date’ and ‘count’ respectively.
As a final note, it is a good idea to ignore data that has been deleted from M-Files. The easiest way to do this is to add a Where-condition where Deleted (state) is set to false.
Our configuration hierarchy for our plot is now complete.
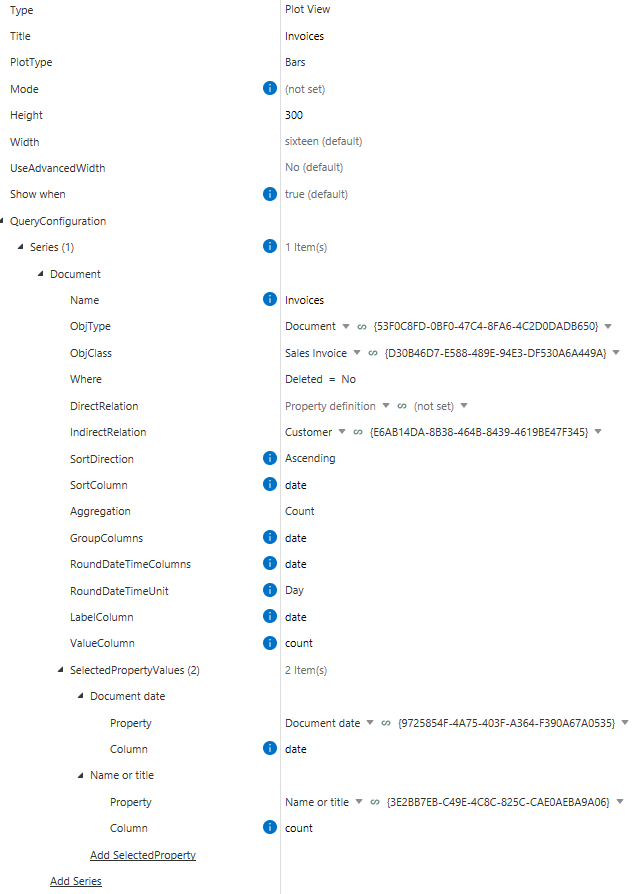
Our final plot configuration#
Now we have a plot in our Customer Portal that shows the total amount of invoices.
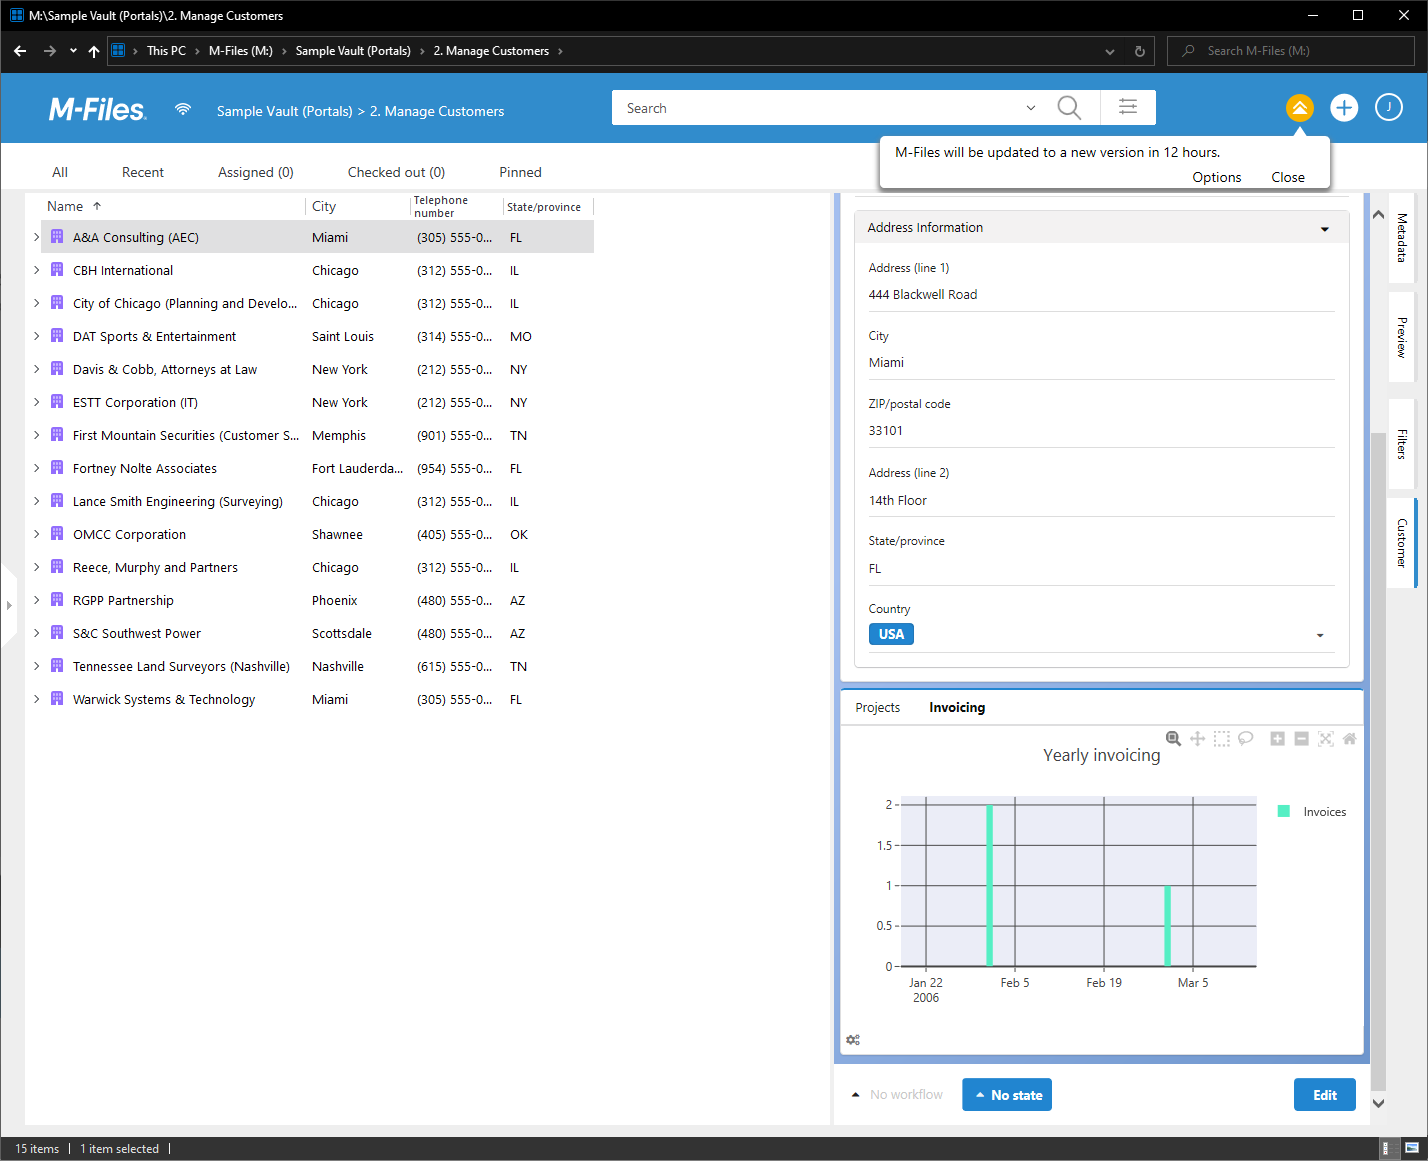
Our final plot#
It turns out that the sample vault only contains very few Sales Invoices and all of them are dated between 2006-2007. If those were our last invoices, our sample company is probably very dead by now 😉
Dashboards#
The final feature I want to go over is the dashboards feature. A Dashboard is like a Portal, but not connected to any particular object. Instead, they are available from the CtrlPortals menu in the left pane. I think that we should make a pie chart to see which companies actually have any Sales Invoices associated with them.
So, we go back to the very top of our configuration hierarchy and select ‘Dashboards’. Here, we add a new Dashboard and name it ‘Invoicing’ by setting the Title field.
Let’s add a GridComponent and a Segment component, then a Single Plot view.
In this plot view, let’s add a Pie chart called ‘Invoices by Customer’, selecting a single series of data from all documents with the class ‘Sales Invoice’, and, again, aggregate by Count. This time, we want to group by customer, which, as we recall, is a property on every sales invoice. So we select two columns, the customer and the count (again, counting the title property).
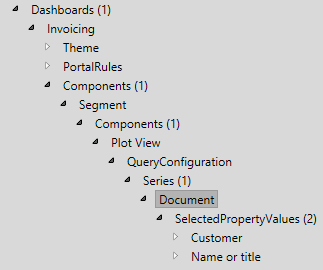
Our dashboard configuration#
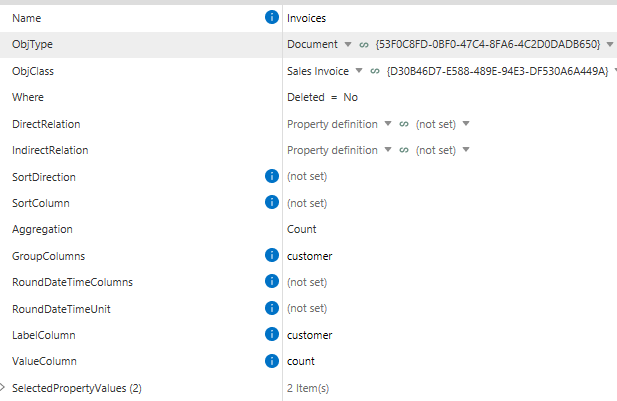
Our dashboard plot configuration#
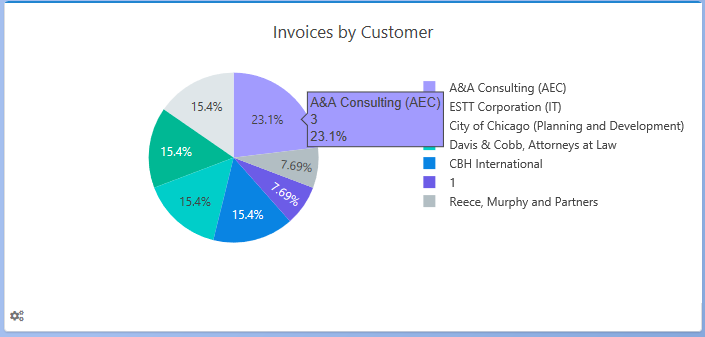
Our dashboard#
Now we can see that there are not a lot of sales invoices at all, the most invoices sent to a single customer is only three.
We could easily imagine illustrating more, such as which year had the most sales invoices, but, in general, the data in the sample vault is rather boring for data analysis purposes.
Final Configuration#
The complete configuration can always be accessed in its raw JSON form through the configuration menu, by clicking the top level of the hierarchy (the one called CtrlPortals - VAF) and selecting the ‘Advanced’ tab. Your configuration should be equivalent to the following JSON:
{
"Employee": {
"ObjType": "{39E23C57-2252-410D-BC06-4F8F65AD90B2}",
"UserProperty": "{4FBF4FCB-5290-413D-8030-8F1DD50F13D2}"
},
"Comment": {
"ObjType": "OT.Comment",
"CommentClass": "{E9AA963E-9783-45F8-9A45-4183EECCC84D}",
"AuthorProperty": "PD.Author",
"ContentProperty": "PD.Content",
"GuidProperty": "PD.Guid",
"ParentGuidProperty": "PD.Parentguid",
"MentionsProperty": "PD.Mentions",
"ParentObjectProperty": "PD.Parentobject"
},
"ObjectPortals": [
{
"Title": "Customer",
"Classes": [
{
"Class": "{5141D850-22EE-4A3D-B3DA-42D6C5AD61A3}"
}
],
"Components": [
{
"Type": "Header Segment",
"HeaderProperty": "{3E2BB7EB-C49E-4C8C-825C-CAE0AEBA9A06}",
"SubHeaderProperty": "{CEBF9AC9-C60C-4240-9F50-723DBF3A5CA7}",
"Icon": "bordered inverted purple building outline icon"
},
{
"Type": "Segment",
"Components": [
{
"Type": "Form",
"Components": [
{
"Type": "Field Column",
"FieldComponents": [
{
"Property": "{41E35AF4-BD8B-4081-AE84-AE80DA747561}"
}
],
"Width": "eight"
},
{
"Type": "Field Column",
"FieldComponents": [
{
"Property": "{26A75524-CEF7-4BE6-80E3-1A997214EE9C}"
},
{
"Property": "{0AA8A9A5-B142-419B-8BF3-298DCF663EBB}"
}
],
"Width": "eight"
},
{
"Type": "Accordion",
"AccordionComponents": [
{
"Type": "Field Column",
"FieldComponents": [
{
"Property": "{C93A5B5D-252C-46D6-923C-04B7B9BFEB81}"
},
{
"Property": "{36257773-024E-46E6-A996-E28AD49CF98F}"
},
{
"Property": "{9A9B2824-8C44-4E40-8E58-C31487840550}"
}
],
"Width": "eight"
},
{
"Type": "Field Column",
"Width": "eight",
"FieldComponents": [
{
"Property": "{13EC8CE6-92BD-478E-8511-FB73EDF9586B}"
},
{
"Property": "{77A8D87B-9AEA-49DF-AC62-ABA86FF1E5D1}"
},
{
"Property": "{82490C2F-8FB2-423B-85B5-F4ADB214C0FD}"
}
]
}
],
"Title": "Address Information"
}
]
}
]
},
{
"Type": "Segment",
"Components": [
{
"Type": "Menu",
"Tabs": [
{
"Components": [
{
"Type": "List View",
"ViewID": 201,
"ListViewOptions": {
"ScrollY": "150"
}
}
],
"Name": "Projects"
},
{
"Name": "Invoicing",
"Components": [
{
"Type": "Plot View",
"Title": "Invoices",
"PlotType": "Bars",
"Height": 300,
"QueryConfiguration": {
"Series": [
{
"Name": "Invoices",
"ObjType": "{53F0C8FD-0BF0-47C4-8FA6-4C2D0DADB650}",
"ObjClass": "{D30B46D7-E588-489E-94E3-DF530A6A449A}",
"IndirectRelation": "{E6AB14DA-8B38-464B-8439-4619BE47F345}",
"Aggregation": "Count",
"SelectedPropertyValues": [
{
"Column": "date",
"Property": "{9725854F-4A75-403F-A364-F390A67A0535}"
},
{
"Property": "{3E2BB7EB-C49E-4C8C-825C-CAE0AEBA9A06}",
"Column": "count"
}
],
"GroupColumns": "date",
"RoundDateTimeUnit": "Day",
"RoundDateTimeColumns": "date",
"Where": [
{
"conditionType": "equal",
"expression": {
"type": "statusValue",
"statusType": "deleted",
"indirectionLevels": []
},
"typedValue": {
"dataType": "boolean",
"value": {
"boolean": false
}
}
}
],
"LabelColumn": "date",
"ValueColumn": "count",
"SortDirection": "Ascending",
"SortColumn": "date"
}
]
}
}
]
}
]
}
]
}
],
"Controls": {
"Enabled": true
}
}
],
"DashboardPortals": [
{
"Title": "Invoicing",
"Components": [
{
"Type": "Segment",
"Components": [
{
"Type": "Plot View",
"PlotType": "Pie",
"Title": "Invoices by Customer",
"Height": 300,
"QueryConfiguration": {
"Series": [
{
"Name": "Invoices",
"ObjType": "{53F0C8FD-0BF0-47C4-8FA6-4C2D0DADB650}",
"ObjClass": "{D30B46D7-E588-489E-94E3-DF530A6A449A}",
"Where": [
{
"conditionType": "equal",
"expression": {
"type": "statusValue",
"statusType": "deleted",
"indirectionLevels": []
},
"typedValue": {
"dataType": "boolean",
"value": {
"boolean": false
}
}
}
],
"Aggregation": "Count",
"SelectedPropertyValues": [
{
"Property": "{E6AB14DA-8B38-464B-8439-4619BE47F345}",
"Column": "customer"
},
{
"Property": "{3E2BB7EB-C49E-4C8C-825C-CAE0AEBA9A06}",
"Column": "count"
}
],
"LabelColumn": "customer",
"ValueColumn": "count",
"GroupColumns": "customer"
}
]
}
}
]
}
]
}
]
}
You can copy this JSON and replace your local version if there is a problem with your configuration or if you just don’t want to walk through all the steps for configuring the portal, but you need to verify that the Comment object’s GUID matches the comment object that you’ve created (if you don’t have a Comment object, you need to create one following the steps of this guide).